Introducing the Qualtrics platform and features
Basic features of Qualtrics
The Qualtrics survey library
Once you have logged in, you will be displayed with your library of surveys. (Obviously if you are new to Qualtrics, this library will be empty - it won’t be long before we fix that!) It is here that all of the surveys that you build will be automatically saved for you to return to.
If you have multiple surveys active at once, this view is a helpful dashboard to monitor how they are all going. Each item in this library will tell you how long the survey is (i.e., how many questions it has and the estimated response time) and, if it has a status of active then, it will also show how many responses there have been so far.
In the top left corner of this window you will also notice All Folders. Clicking on this will open a menu on the lefthand side of your screen, which is where you can organise your surveys by filing away surveys in particular folders.
Today we’re going to focus on building surveys, however if you want to know more, here is a page on organising your projects in Qualtrics.
Creating a project, building a survey
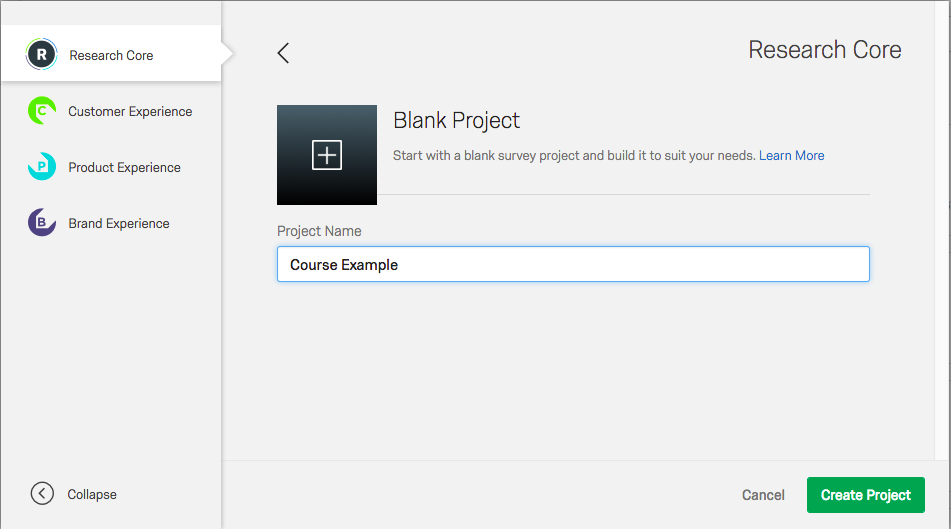
On this page you will see a green button in the top right corner called + Create Project - surprise, surprise, this is where we’ll start our surveys today. Clicking on this button will take you to a collection of templates.
Aside from the templates, the three most common options you will use here are Blank Survey Project to create your survey from scratch and Create From Existing where you can copy an existing survey and modify it under a new project name.
For our purposes, in order to further explore the Qualtrics platform, let’s create a project using Blank Survey Project and call it “Course Example”.

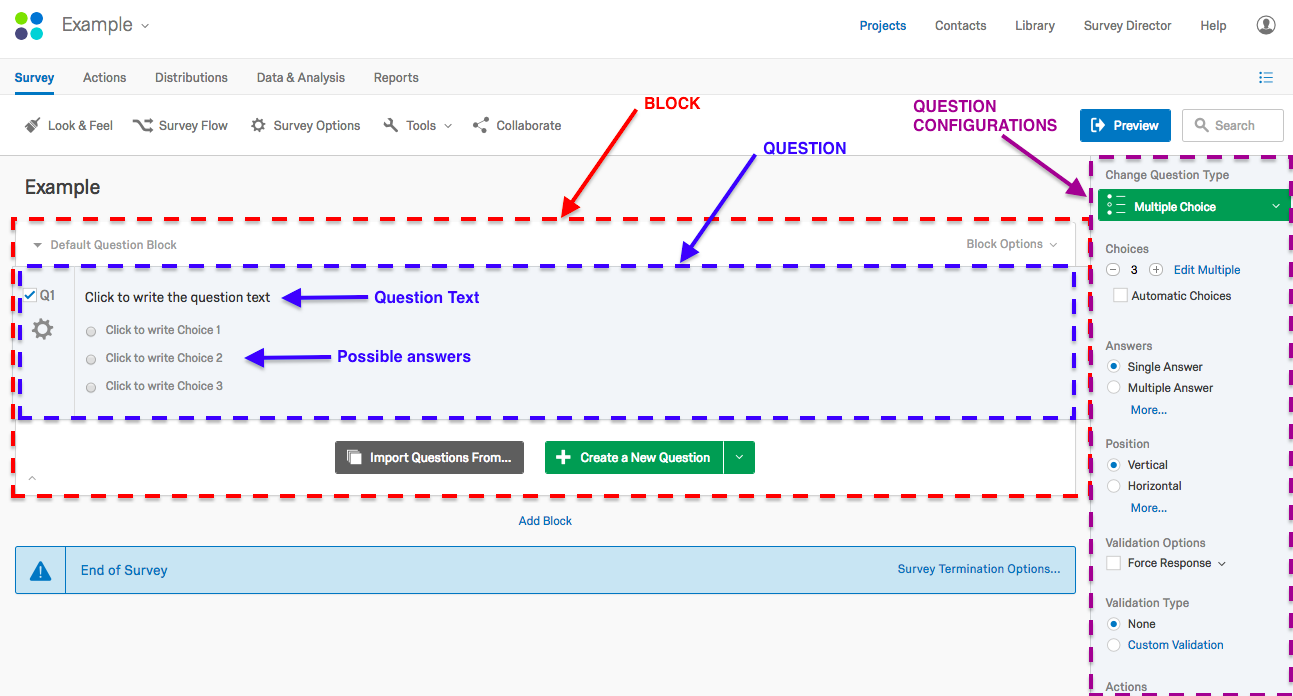
Then we’ll come to a window with many more features for use to build our survey. For the time you are on Qualtrics, you will probably spend 80-90% of your time on this screen, so let’s explore its many options. This is called the Survey Editor.
Introducing the Survey Editor
Toolbar

The first thing to pay attention to is the toolbar at the top, which includes:
- Look & Feel - here you can design your survey appearance including adding any headers and footers, adding logos, applying colors, etc. We’ll explore this a bit later on.
- Survey Flow - where you configure the sequence of your survey using, what Qualtrics calls, “blocks”. We dive into this feature in our Intermediate course (currently under development), but if you want to find out more information about survey flows, here’s a page on it
- Survey Options - where there is a number of options to tailor how the survey performs, which you can easily turn on or off.
- Tools - a very helpful menu to further enhance your survey performance and analysis. Such things like creating a email list of your participants or importing a pre-made survey can be done here.
- Collaborate - last but not least, our option to share the survey with anyone who has access to Qualtrics for them to help you in its design.
Then on the righthand side we have an option to Preview Survey and to search (which searches all of the text in your questions)
The line of options above the toolbar (with Survey, Actions, etc) is also interest but let’s return to this later. Basically, these are the options that we’ll want to use as we progress through the survey workflow. For now, we are in the Survey tab because we are building a survey.

Blocks
The other significant part of the Survey Editor is how we can create and edit our survey questions.
One important thing to learn about Qualtrics surveys is that they are created using “blocks”. Blocks are like sections or components of the survey. The advantage of building your survey with blocks is that it is easy for you engineer the experience of the respondent, depending on a few factors (again, Survey Flow is where we would do this, which we cover in the Intermediate Course). If this is not something of importance to you, then you can have all of your questions in just one block.
Questions and Question Types
Within the Blocks is where questions are developed. Creating questions is as easy as a click on + Create a New Question, which, if you press this, will create a multiple choice question by default. You can edit the survey question if you click on the question test field. Similarly for the questions possible responses, click on the greyed text below the question and enter your options.
For all configurations of the question, including changing the question type, the number of answer choices, how the question displays and what possible answers can be given to the question, can done in the righthand menu.
Next
In the next module we’re going to explore all of these features.
 Surveying with Qualtrics (Introduction)